


ZoomLock™ Tool Review
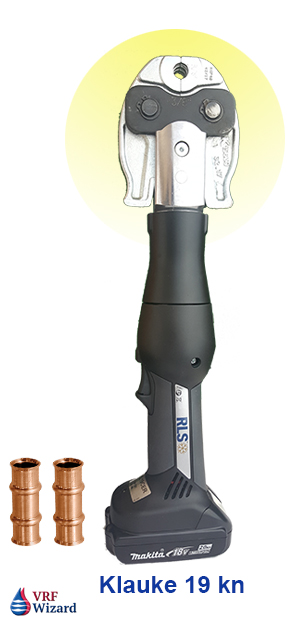
For those of you that are new to press-fit tools we will cover the features of the Klauke 19 kn tool used on ZoomLock™ fittings, this includes the tool, jaw sets, fittings and accessories required to make a joint.
You maybe familiar with ProPress™, which is a similar press-fit fitting that is used in water applications, such as Domestic Plumbing, Heating Hot Water, Chilled Water and Condenser Water. The ZoomLock™ fitting is being used in refrigeration systems, allowing you to avoid using a torch. This is definitely an innovative fitting and tool.
Just like your car this tool has a brake, except unlike your car you don’t need to push any additional pedals or buttons; the tool automatically brakes and stops the forward motion of the piston when you release the trigger button. Similar to the bumper cars at the fair, when you let your foot off the gas the car wants to stop. The Ridgid tool keeps pressing until the cycle is complete, so there is no turning back, at least the Kluake will allow you to stop.
There is no need to hold a flashlight on the area where you’re making the fitting as the tool uses a white LED to illuminate the working space after activating the trigger. The light will automatically go off after 10 seconds from the release of the trigger. This feature is also capable of being deactivated.
You don’t have to worry about whether you squeezed the fitting hard enough as the tool has a built-in pressure sensor that will sound an alarm if the minimum required pressure was not applied. And when the required pressure has been reached the tool automatically retracts to its starting position. In the case that you didn’t achieve the required pressure you can manually return the piston to the starting position.
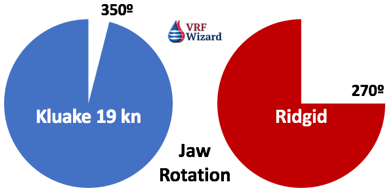
The head of the tool can rotate 350 degrees allowing you to access difficult to reach fittings in corners and around objects, the Ridgid tool is limited to 270 degrees.
For all of you concerned about the environment, not only does this tool avoid the use of burning fuel, but the oil used is biologically biodegradable and nonhazardous to water for which they received the Blue Angel award which is a German environmental label.

The tool has the capability of providing a printout documenting the proper function of the tool at the end of your project by using a USB adapter.
Make sure you read and follow the installation instruction to avoid the improper use of ZoomLock™ fittings and accessories which could cause death, personal injury or property damage as stated in their brochure. You can also do a lot of damage with a torch if you don’t follow directions.
Also, with any refrigerant containing system you’ll want to comply with ASHRAE-15 & 32 to ensure the safety of the occupants if there was a leak in the system, this applies with either a ZoomLock™ fitting or a brazed fitting.
The ZoomLock™ fitting uses a special HNBR O-Ring within the fitting that provides a tight seal after properly being pressed with the Jaws of an approved tool such as the Klauke 19 kn for sizes from 1/4” up to 1-3/8”.
For high pressure refrigerants like 410A, special jaws are required. You can’t use the same jaws that you use for your ProPress or other low pressure press-fit systems. Also, the positioning of the jaw differs when using a ZoomLock fitting versus a ProPress or other low pressure press-fit fitting. (See image below for positioning)
The ZoomLock™ fitting comes in Copper or Aluminum for the use on their respective refrigeration systems. In this review we are discussing the use of the copper fitting on copper tubing.
ZoomLock Tool Kit Description
The ZoomLock 5 Jaw Tool Kit comes with the following
- Padded carrying case made of durable plastic.
- Inside the case you will find a Tube Cutter, Deburring Tool, Crimp Gauge, Depth Gauge, Stainless Steel Brush, Abrasive Pad and Permanent Marker. (See image below)
- Jaw sizes include , 3/8”, 1/2”, 5/8”, 7/8” & 1-1/8”. The following jaw sizes are sold separately; 1/4”, 5/16”, 3/4″ & 1-3/8″. You can buy the tool without the jaws, or get either the 5-jaw or 8-jaw set.
- It comes with two (2) Rechargeable 18-volt Makita batteries with a 15 minute charging time for the 1.3 ah (amp-hour) battery, and 22 minutes to charge a 3.0 ah battery. The higher amp-hour batteries can provide more connections per charge, but add more weight to the tool. With two batteries you’ll never be without crimping power.
- With the 1.3 ah battery you get 150 cycles per charge and with the 3.0 ah battery you can get 300 cycles per charge.
- There is a 2 year warranty from the time of the delivery of the tool and 5-years on the fittings.
- The tool with the battery attached weights 1.88kg or 4.1 lbs as opposed to the Ridgid tool which weights over 6 pounds.
- The pressing cycle is about 3-4 seconds
- Thrust force is 19 Kn (Kilo newton) or 4,271 Lbs.
- You can buy the Tool without the Jaws, or get either a 5-Jaw or 8-Jaw Set.
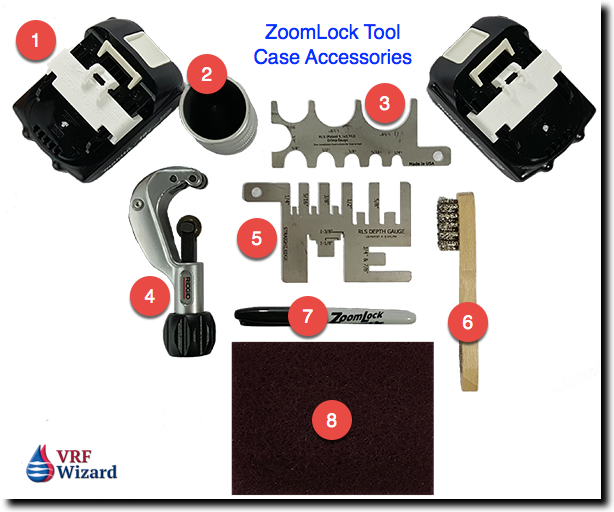
- Two Batteries
- Deburring Tool
- Crimp Gauge
- Tube Cutter
- Depth Gauge
- Stainless Steel Brush
- Marker
- Abrasive Pad
Pros, Cons & Comparison

The advantages of using a Press-fit fitting with the Klauke kN 19 is that there is
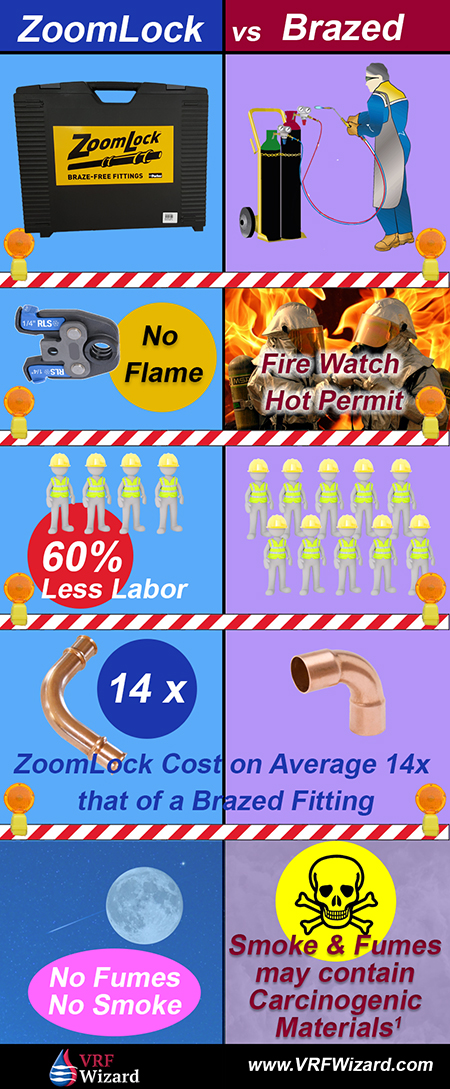
- No Brazing Necessary
- No Nitrogen purge required
- No danger of particulate formation
- No danger of melting or burning of ambient materials in the area (such as adjacent wiring and pneumatic lines)
- No burn permits needed
- No fire brigade standby necessary
- No shutdown of smoke or fire sensors in the area
- No cooling of brazed joints – immediate usage following leak test
- No solder residue clogging or damaging inline devices like expansion valves
- Minimum customer/patient/tenant disruption
- Labor savings of 60% or greater
- Less training and a lower skill level required to make a proper joint
- Avoids toxic substances created by burning refrigerant and oil residue with torch. See the links at the end of this article for research that documents the toxicity of brazing.
- Battery only requires 15 minutes to charge. (1.3 Ah)
- 150 cycles per charge
- Only 3 to 4 seconds per pressing cycle
- 350 degree rotating head
- Light weight and well balanced when operating
- It has the following agency approvals, UL 207, ASHRAE-15, 2015 IMC, IRC & UMC
The Cons or Disadvantage of the Klauke or the ZoomLock fitting;
- Educating the customer, engineer or owner on the benefits and features of a press-fit joint
- Resistance to change can be a challenge at some companies and amongst some leaders. In this situation the best thing to do is get your vendor to demonstrate the tool and fitting to the decision makers.
- Cost of the fittings, clamps and tool.
- Remembering to crimp the 1-3/8” fitting twice. This size requires two cycles of crimping.
Other Fittings & Tools
There are other press-fit fittings used for refrigerant piping such as the Lokring fitting and other tool manufactures such as Ridgid. The Lokring composite fitting requires 5 individual pieces to make a joint, so it’s more labor intensive than the one piece ZoomLock™ fitting.
There is also Bendable Copper that saves on fittings and reduces brazing labor up to 70% +, see Reftekk Bendable Copper.
You can also checkout the SmartLock Fitting which saves up to 90% of the labor compared to a brazed fitting according to the manufacture.
Ridgid makes the RP 100-B, RP 200-B, RP 210-B, RP 240 & RP 241 with Jaw sizes from 1/4” to 1-3/8”. The Klauke rotates 350 degrees and is a couple pounds lighter than the Ridgid tool, which makes a big difference when you are holding it above your head or trying to rotate the head in a tight space to make a connection.
Who Should Own This Tool
Having this tool available can save time and money for contractors as time is money and the quicker you can get in and out of a job, the more jobs you can get done in a day.
For maintenance personnel and building owners this product can help them quickly repair a leak without the need for a torch or waiting for a contractor to show up or schedule it into their schedule.
Installation Instructions
Here we will briefly cover the installation requirements when using the Klauke 19 kn and ZoomLock™ fittings. Remember to achieve a leak free system, it’s imperative to follow the simple protocol as defined by the manufacture. Don’t cut corners or use sub-standard tools.
Step 1 – Cut the copper tubing using an approved pipe cutter. Don’t use a saw or other type of blade that will cause the end of the pipe to have a rough finish or sharp edge, as this could damage the O-Ring and provide a path for a leak to occur. Make sure your tube cutter is sharp and in good working order.
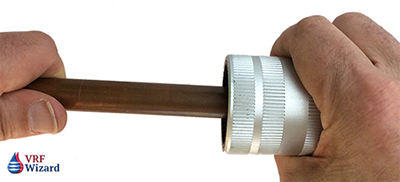
Step 2 – Use the deburring tool that comes in the Klauke kit, rotate it 5 to 7 times to remove any outer burrs that could damage the O-Ring. Don’t slide the fitting over a recently cut piece of tubing without first removing any sharp edges or burrs caused by the tube cutter.
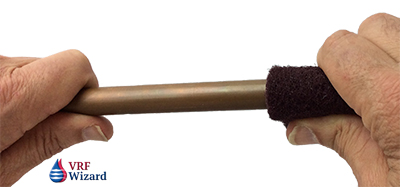
Step 3 – You must then sand and clean the outer tubing by rotating the heavy duty abrasive pad provided with the kit or by using 180 grit sandpaper. Do this for 5 to 7 seconds or 10 to 14 times back-and-forth to remove residual debris from the tubing ends. Don’t sand lengthwise, but use a rotating motion around the circumference of the tubing.
Step 4 – Make sure to visually inspect the copper tubing after sanding to make sure that there aren’t any scratches, incisions or other marks that could interfere with the proper sealing of the fitting. Don’t use tubing that has scratches, incisions or other defects within the first 1-1/2” of the tube end. Remove amy defects and repeat the above steps to secure a leak free connection.
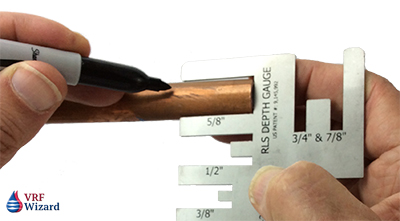
Step 5 – With the marker and depth gauge provided you will indicate the depth that the fitting must slip over the tubing in order to provide the needed tubing insertion length. Slide your tubing onto the depth gauge in the slot indicated by the size of your tube. Using the permanent marker, make a mark on the tubing as indicated by the gauge for the proper insertion depth. Don’t estimate or eyeball the depth without the use of the depth gauge or by measuring using the chart.
Step 6 – Take your ZoomLock fitting and slide it onto your tubing making sure that the end of the fitting reaches the insertion mark from step 5. Don’t proceed unless the insertion depth has been reached.
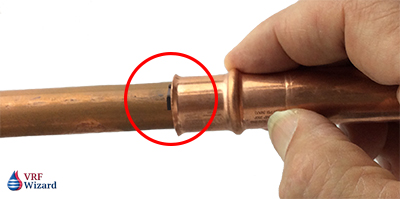
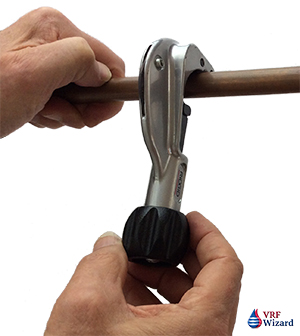
Step 7 – Place the jaws of the Klauke crimping tool over the ZoomLock fitting making sure that the center of the jaw is between the O-Ring and outer flange of the fitting. The outer grooves of the jaw should be both on the O-Ring and the outer flange, with the center of the jaw in between them. Don’t place the center of the jaw onto the O-Ring as done with a ProPress fitting.
See Video below for Tool Demonstration
Step 8 – Press and hold the trigger of the crimping tool until the crimping cycle is complete.
Step 9 – Remove the jaw from the fitting. If the jaws won’t open then the crimping cycle wasn’t completed. In this case you would need to press the manual override button to release the jaws.
Step 10 – For a fitting sized 1-3/8” you will need to provide a second crimping with the tool positioned 45 to 90 degrees from the first crimp cycle. Don’t forget to provide the second crimping of any fitting 1-3/8” in size.
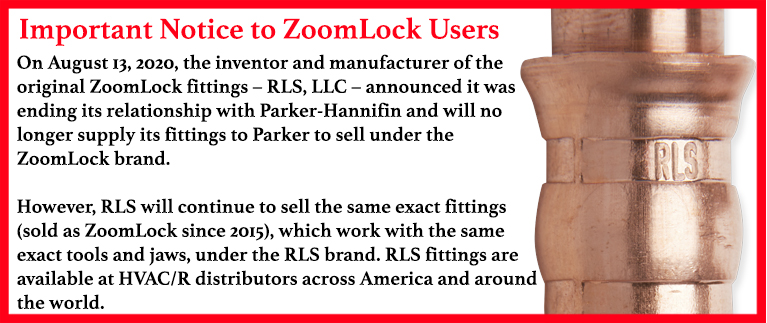
Step 11 – As part of the QC process and if the fitting was properly crimped you should see the letters “RLS” imprinted in the grooves of the crimped fitting. RLS (Rapid Locking System) is the initials of the company that has a patent on the fittings which was licensed to Parker Sporlan and marketed under the trade name of ZoomLock™. RLS LLC is part of The Marmon Group, a Berkshire Hathaway Company.
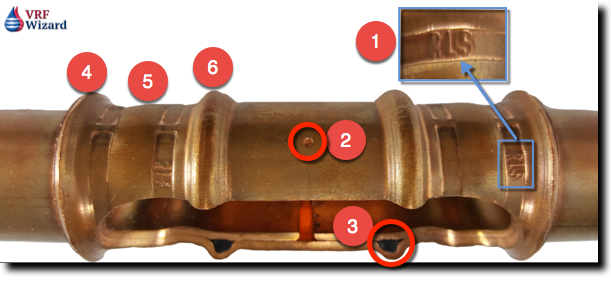
- When properly crimped you should see the letters RLS imposed on the pressed fitting
- This dimple prevents the tubing from being inserted to far from one side and provides a stopping point for each tube.
- The O-Ring
- Fittings outer Flare.
- The Jaw is centered between the Outer Flare (#4) and O-Ring (#6).
Step 12 – The second part of the QC process is again to confirm that the crimp was done successfully. Using the Crimp Gauge provided in the kit, you will confirm that the diameter of the finished crimp band fits snuggly into the crimp gauge based on the size of the fitting used. Don’t proceed any further unless the Crimp Gauge fits snuggly around the crimp.
Conclusion
The Klauke 19 kn is a great tool for those considering using ZoomLock or for those replacing an existing tool. The Klauke 19 kn is light weight, well balanced and provides a 350 Degree rotating head which we believe will make installation easier when you find yourself in hard to reach places, like most conditions on job sites.
The ZoomLock tool definitely fits into the contractor’s bag of go-to-tools and should be something that you offer as the main option to the torch and flame method. The cost of the ZoomLock™ fittings has to be compared against the labor savings, as the fittings are on average 14 times as costly as a brazed fitting, but the 60% or greater reduction in time to make a joint will save considerably on labor cost depending on your labor rates. In addition the extra cost of the fitting, you need to thing about the increased safety factor of using a press-fit tool that has no flame or toxic fumes.
One drawback of the press-fit fitting and not the tool is that if you do need to make a brazed joint for some reason, you’ll need to keep the minimum distances as recommended by ZoomLock™ to avoid damaging the O-ring. This distance varies from 5” (127mm) for a 1/4” through 1/2” fitting to 13.75” (349.3mm) for 1-3/8” fitting.
Press-fit fittings are here to stay and are growing in market share and acceptance by engineers, contractors and municipalities. The only question now is when will you adopt this method? It’s possible that your competition has convinced the owner that they can install the required refrigerant piping without subjecting the building to a fire hazard or the occupants to the byproducts of a torch.
When the owner proposes the question to you about your familiarity with ZoomLock, and the amount of projects you have completed using the ZoomLock fitting and press-fit tool, what will your answer be? Don’t let your competition be more innovative than you. Don’t wait for the owner or General Contractor to suggest the use of ZoomLock before you offer the option. Remain an innovator who provides various solutions, instead of a company with only one tool in their toolbox.
It’s not a question about the integrity of the fitting, but about your ability to follow the required procedures to make the proper joint by following the simple installation protocol, and your company’s ability to have a QC policy in place to make sure that protocol is followed and checked regularly. The ZoomLock™ fitting works and has been tested and approved for the refrigerants listed, including the commonly used R410A in VRF systems.
The question is, are you an innovator with more than one tool in your tool box, or will the owner be given that option from your competition?
If you’re not currently using the Klauke tool and the ZoomLock™ fitting, I suggest you call your local representative and get a demonstration and any question you have answered. Make sure that those who are going to use the tool and the decision makers are at the demonstration. Also, checkout the ASHRAE study on Mechanical Piping Joints.
References (from Info-graph)
- University of Alabama – Environmental Health & Safety – Welding, Cutting & Brazing are Hazardous Activities.
1. Fumes Produced During Brazing.
ZoomLock™ Documentation
- Sell Sheet http://www.rlspressfittings.com/wp-content/uploads/2015/12/RLS-sell-sheet-12_15.pdf
- Document on 3rd Party Testing. http://www.rlspressfittings.com/wp-content/uploads/2015/01/RLS_Third_Party_Testing.pdf
Disclosures
- The VRF Wizard wasn’t paid for this review.
- The tool was provided by RLS for this review.
See these other Piping Connections;


